Archive Items Manually in Outlook
Your Outlook mailbox is only so big, and it’s a good bet that you won’t stop getting an email anytime soon. To keep it from filling up, you can move old items you want to keep to an archive, a separate Outlook Data File (.pst) that you can open from Outlook any time you need it.
Note: The Archive command and feature doesn’t appear for any account in your Outlook profile if you include an Exchange Server account and your organization uses Microsoft Exchange Server Online Archive. Your network administrator can also disable this feature.
Newer versions
AutoArchive, which is turned on by default, automatically moves old items to an archive location at scheduled intervals. However, you can manually back up and archive items to a location that you specify.
Note: The Microsoft Office Outlook 2007 AutoArchive settings are customizable. Rather than backing up or archiving your items manually, you may find that AutoArchive can meet your needs. For more information, see Using AutoArchive to back up or delete items.
- On the File menu, click Archive.
- Select the Archive this folder and all subfolders option, and then specify a date under Archive items older than.

- Under Archive file, click Browse to specify a new file or location if you do not want to use the default file or location.
- Select the Include items with "Do not AutoArchive" checked check box if you want to override a previous setting to not automatically archive specific items. If you choose to manually archive these items during this procedure, the items will again be subject to the Do not AutoArchive setting unless you manually override that setting again in the future.
- Click OK.
Outlook 2010
By default, older Outlook items archived automatically on a regular interval. To learn more about AutoArchive, see Use AutoArchive to back up or delete items.
You can also manually back up and archive items, in addition to AutoArchive or as a replacement. Manual archiving provides flexibility, and allows you to specify exactly which folders are included in the archive, and which archive Outlook Data File (.pst) is used.
To manually archive Outlook items, do the following:
- Click the File tab
- Click Cleanup Tools.
- Click Archive.
- Click the Archive this folder and all subfolders option, and then click the folder that you want to archive. Any subfolder of the folder you select is included in this manual archive.
- Under Archive items older than, enter a date.
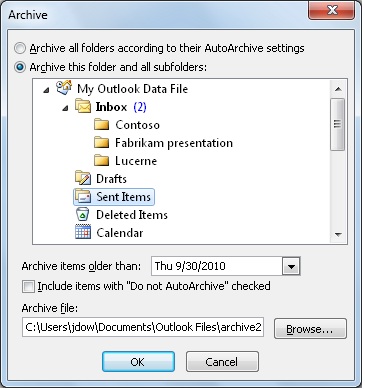
- If you do not want to use the default file or location, under Archive file, click Browse to specify a new file or location. Browse to find the file that you want, or enter the file name, then click OK. The destination file location appears in the Archive file box.
- Select the Include items with “Do not AutoArchive” checked check box to include any items that might be individually marked to be excluded from automatic archiving. This option does not remove that exclusion from these items but instead ignores the Do not AutoArchive check box for this archive only.
Turn off AutoArchive
If you want to archive only manually, you must turn off AutoArchive. Do the following:
- Click the File tab.
- Click Options.
- On the Advanced tab, under AutoArchive, click AutoArchive Settings.
- Clear the Run AutoArchive every n days check box.
Outlook 2007
AutoArchive, which is turned on by default, automatically moves old items to an archive location at scheduled intervals. However, you can manually back up and archive items to a location that you specify.
Note: The Microsoft Office Outlook 2007 AutoArchive settings are customizable. Rather than backing up or archiving your items manually, you may find that AutoArchive can meet your needs. For more information, see Using AutoArchive to back up or delete items.
- On the File menu, click Archive.
- Select the Archive this folder and all subfolders option, and then specify a date under Archive items older than.
- Under Archive file, click Browse to specify a new file or location if you do not want to use the default file or location.
- Select the Include items with "Do not AutoArchive" checked check box if you want to override a previous setting to not automatically archive specific items. If you choose to manually archive these items during this procedure, the items will again be subject to the Do not AutoArchive setting unless you manually override that setting again in the future.
- Click OK.
Note: Outlook automatically creates another archive file for items in the folder and location specified.